When your Mac won't connect to Wi-Fi but your phone and other devices work fine, the problem is almost always software or settings, not broken hardware. macOS Sequoia also moved everything into System Settings and changed how private Wi-Fi addresses work, which is enough to break connections that used to be stable.
The 18 fixes below are ordered from fastest to most advanced, so start at the top and stop as soon as you get back online. Most people are fixed within the first five steps.
Symptom to Fix Quick Reference
Wi-Fi problems on a Mac show up in a few distinct ways, and each pattern points to a different group of fixes. Use this table to jump to the section most likely to help before you work through the full list.
| What you see | Most likely fix |
|---|---|
| No networks show up at all | Restart, toggle Wi-Fi, reset network preferences (Fixes 1, 2, 15) |
| Wrong password loop on a known network | Forget and rejoin the network (Fix 4) |
| Connected but no internet | Renew DHCP lease and set new DNS (Fixes 7, 8) |
| Wi-Fi drops or disconnects repeatedly | Set Private Wi-Fi Address to Fixed (Fix 6) |
| Started after a macOS update | Update again, then check VPN and filters (Fixes 5, 11) |
| Wi-Fi: No hardware installed | Reset NVRAM or get hardware checked (Fixes 16, 18) |
Restart Your Mac
A restart clears temporary network glitches and forces your Mac to request a fresh connection from your router. It is the single most effective first step, so do not skip it.
Click the Apple menu and choose Restart. When the login screen appears, uncheck Reopen windows when logging back in so you get a clean startup, then sign in and try your network again.

Toggle Wi-Fi Off and On
Turning Wi-Fi off and on again resets the radio and often clears a stuck connection in seconds. This is faster than a full restart and worth trying first if you are in a hurry.
Click the Wi-Fi icon in the menu bar and switch Wi-Fi off. Wait about 15 seconds so the connection fully drops, then turn it back on and let your Mac rejoin the network.
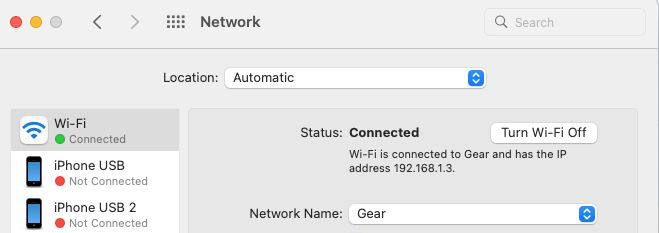
Confirm the Network and Password
Before you change any settings, make sure you are joining the right network and that the network itself is working. Check that another device, such as your phone, can reach the internet on the same Wi-Fi.
If only your Mac fails, confirm you are not accidentally connecting to a neighbor's network or a guest network with no internet access. Re-enter the password carefully, since Wi-Fi passwords are case sensitive and a single wrong character will block the connection.
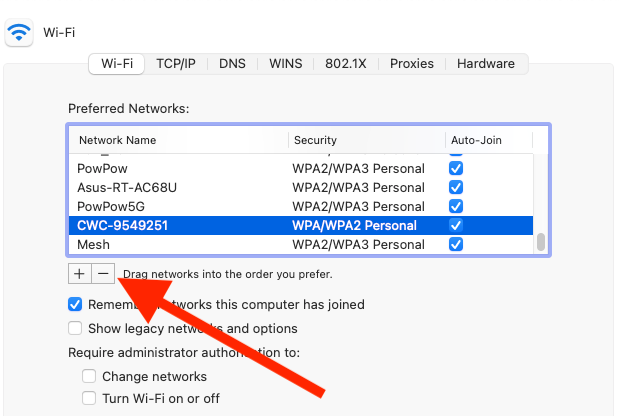
Forget the Network and Rejoin
If your Mac repeatedly rejects the password or refuses to connect to one specific network, the stored network profile is likely corrupted. Removing it and rejoining forces macOS to rebuild that profile from scratch.
Go to System Settings > Wi-Fi, click Details next to your network, then click Forget This Network and confirm with Remove. To clear a network you are not currently on, scroll down and click Advanced, find the network, click the menu button next to it, and choose Remove From List. Then reconnect and enter the password again.
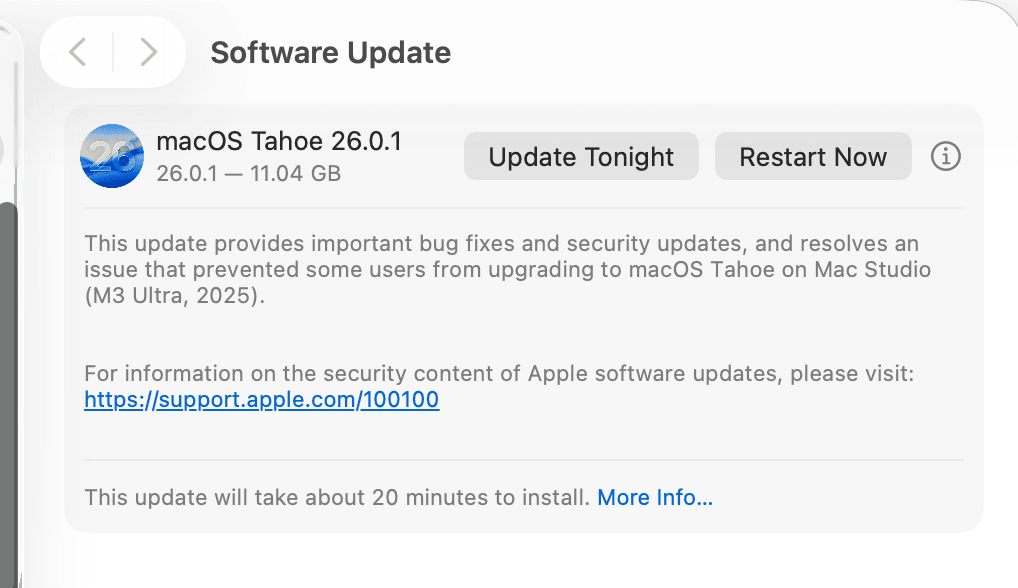
Update macOS
Wi-Fi bugs are common right after a major release and Apple usually patches them quickly in point updates. Running the latest version of macOS Sequoia often resolves connection drops introduced by the upgrade itself.
Go to System Settings > General > Software Update and install any available update. If your Mac cannot get online to download it, connect over Ethernet or a phone hotspot first, and back up your data before any major update.
Set the Private Wi-Fi Address to Fixed
macOS Sequoia changed the private Wi-Fi address feature so it can rotate to a new address over time, and some routers treat each new address as an unknown device and block it. Switching to a fixed address gives your router one consistent identity to trust.
Go to System Settings > Wi-Fi, click Details next to your network, then find Private Wi-Fi Address and set it to Fixed instead of Rotating. Reconnect and check whether the drops stop.
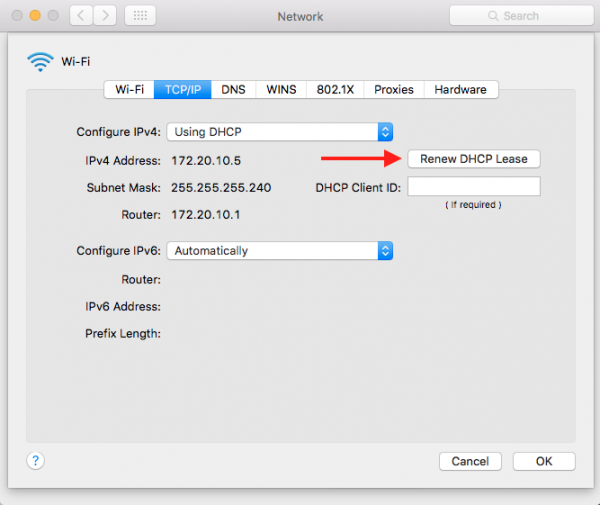
Renew the DHCP Lease
If you are connected to Wi-Fi but have no internet, your Mac may be holding a stale or conflicting IP address. Renewing the DHCP lease asks your router for a fresh address without changing anything else.
Go to System Settings > Network, click Wi-Fi, then click Details. Open the TCP/IP tab, click Renew DHCP Lease, and click OK.
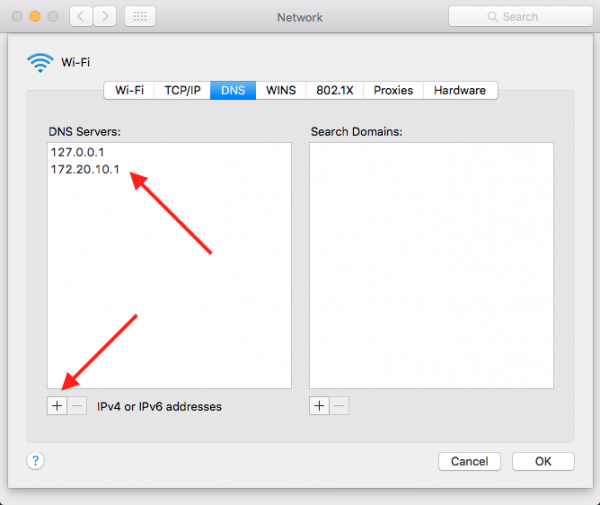
Set a Reliable DNS
A connection that loads nothing in the browser despite a working Wi-Fi signal often comes down to a failing DNS server from your provider. Pointing your Mac at a public DNS service usually restores web access immediately.
Go to System Settings > Network > Wi-Fi > Details and open the DNS tab. Click the plus button under DNS Servers and add Google DNS (8.8.8.8 and 8.8.4.4) or Cloudflare DNS (1.1.1.1 and 1.0.0.1), then click OK and Apply.
Reset the Network Location
If you move between home, office, and public Wi-Fi often, a custom network location can carry settings that no longer apply. Returning to the Automatic location clears those leftovers.
Go to System Settings > Network, click the Action pop-up menu (the three dots or button below the service list), choose Locations, and select Automatic. Reconnect to your network afterward.
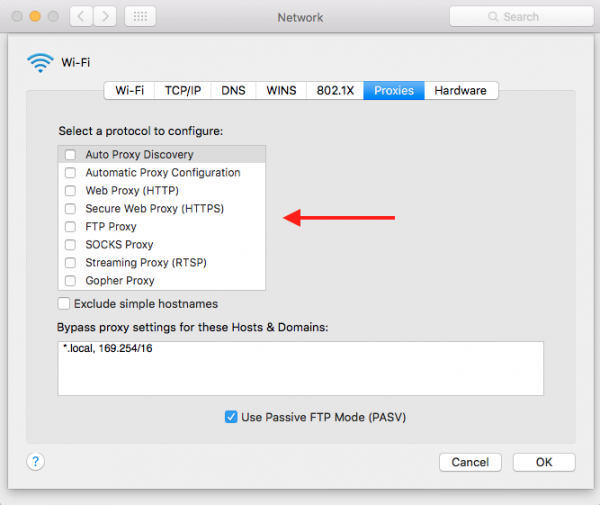
Disable Proxy Settings
A leftover proxy configuration will quietly route your traffic to a server that no longer exists, which looks exactly like a dead internet connection. Turning proxies off rules this out in a few clicks.
Go to System Settings > Network > Wi-Fi > Details and open the Proxies tab. Make sure every proxy protocol in the list is switched off, then click OK and Apply.
Disable VPN and Network Filters
VPN apps, content blockers, and old security tools install network filters that can override your connection even when the app looks closed. Disabling them temporarily shows whether one of them is the cause.
Go to System Settings > Network and check VPN & Filters. Set any active VPN or filter to disabled, and quit any third-party VPN or firewall app from the menu bar. Restart your Mac and test the connection again.
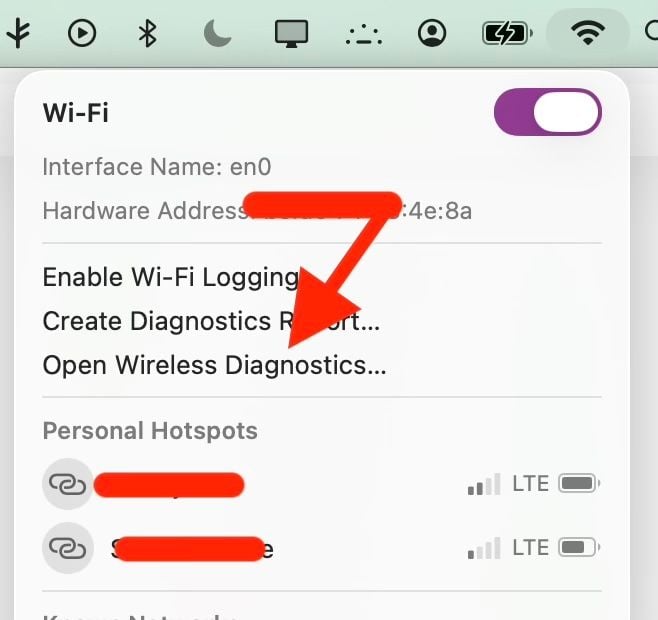
Use Wireless Diagnostics
macOS includes a built-in tool that scans your connection and reports issues such as weak signal, channel conflicts, or DHCP problems. It analyzes your network without changing any of your settings.
Hold the Option key and click the Wi-Fi icon in the menu bar, then choose Open Wireless Diagnostics. Follow the on-screen steps, then click the info buttons in the Summary pane to read each finding and its suggested fix.
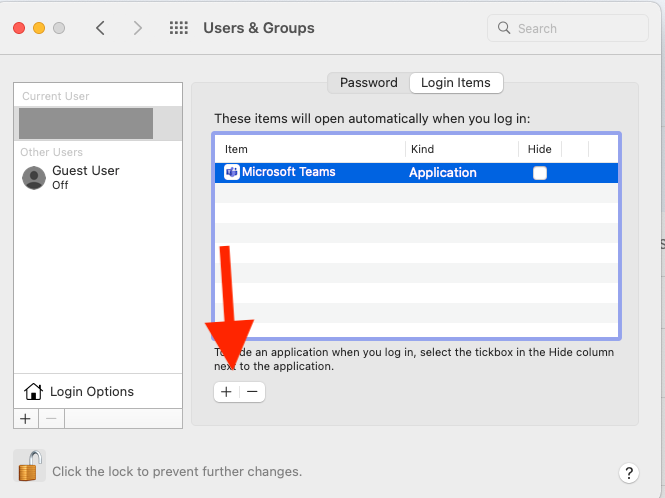
Remove Login Items
Apps that launch at startup can include network agents that interfere with Wi-Fi before you even open anything. Trimming the list rules out a rogue background app.
Go to System Settings > General > Login Items & Extensions. Select any app you do not need at startup and click the minus button, then scroll to Allow in the Background and turn off anything network related you do not recognize. Restart to apply the changes.
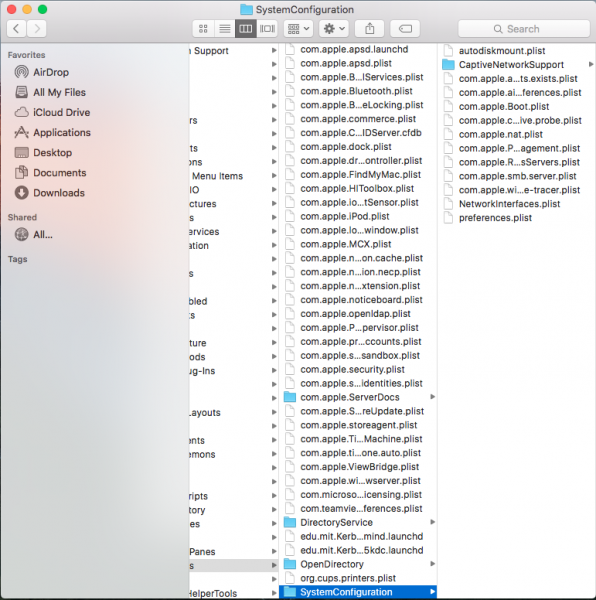
Reset the SystemConfiguration Files
When Wi-Fi stays broken after the steps above, the macOS network configuration files themselves may be corrupted. Removing them forces macOS to rebuild clean defaults on the next boot, after which you re-add your networks.
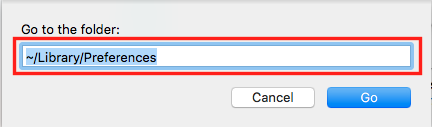
Open Finder, press Command + Shift + G, and go to the folder below. Copy everything inside to a backup folder first, delete the originals, then restart your Mac.
/Library/Preferences/SystemConfiguration/
Delete the Wi-Fi Preference Files
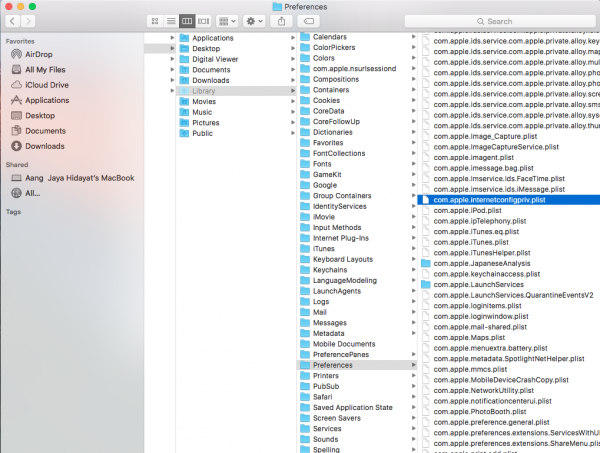
If a single reset is not enough, removing the specific Wi-Fi preference files clears stored networks, saved channels, and IP assignments that may be holding bad data. macOS recreates them automatically when you reconnect.
In that same SystemConfiguration folder, back up and then delete the files below, then restart and rejoin your network with the password.
- com.apple.airport.preferences.plist
- NetworkInterfaces.plist
- preferences.plist
Reset NVRAM on Intel Macs
On Intel-based Macs, resetting the NVRAM can clear low-level network and hardware settings that survive a normal restart. This step does not apply to Apple Silicon Macs.
On an Intel Mac, shut down, then power on and immediately hold Command + Option + P + R for about 20 seconds to reset the NVRAM. Apple Silicon Macs (M1, M2, M3, and later) have no NVRAM reset combination because they test and clear NVRAM automatically on every boot, so a full shutdown for 30 seconds followed by a normal start does the same job.
Restart Your Router
If every device on your network is slow or offline, the router is the more likely culprit than your Mac. A power cycle clears its memory and re-establishes the link to your provider.
Unplug the router, wait about 30 seconds, then plug it back in and let it fully restart before reconnecting. While you are in there, check the manufacturer app or admin page for a firmware update, since outdated router firmware causes many compatibility issues with newer macOS releases.
Check the Hardware and Contact Apple
If your menu bar shows Wi-Fi: No hardware installed or none of the software fixes work, the Wi-Fi card or antenna may have failed. This is rare but does happen, especially after physical damage or liquid exposure.
Connect over Ethernet or a USB adapter to confirm the rest of the system works, then back up your Mac. Contact Apple Support or visit an Apple Authorized Service Provider to have the hardware checked.
Frequently Asked Questions
Why won't my Mac connect to Wi-Fi when other devices can?
When only your Mac fails, the cause is usually a corrupted network profile, a stale IP address, or a settings conflict rather than the router. Start by toggling Wi-Fi off and on, then forget and rejoin the network, then renew the DHCP lease.
How do I forget and rejoin a Wi-Fi network on macOS?
Go to System Settings > Wi-Fi, click Details next to the network, then click Forget This Network and confirm. For a network you are not on, open Advanced, find it in the list, and choose Remove From List, then reconnect and enter the password again.
Why does my Mac say connected but there is no internet?
This points to an IP or DNS problem rather than the Wi-Fi link itself. Renew the DHCP lease under Details > TCP/IP, and if that fails, add a public DNS such as 8.8.8.8 or 1.1.1.1 under Details > DNS.
How do I reset network settings on a Mac?
Open Finder, press Command + Shift + G, and go to /Library/Preferences/SystemConfiguration/. Back up the files inside, then delete com.apple.airport.preferences.plist, NetworkInterfaces.plist, and preferences.plist, and restart. macOS rebuilds clean network settings and you re-add your networks.
Does my router or my Mac cause Wi-Fi problems?
If every device on the network is affected, the router or your provider is the issue, so restart the router first. If only your Mac is offline while other devices work, the problem is on the Mac and the software fixes above apply.
Did macOS Sequoia break my Wi-Fi?
Sequoia introduced a rotating private Wi-Fi address that some routers reject, which can cause repeated drops. Set Private Wi-Fi Address to Fixed under System Settings > Wi-Fi > Details, and install the latest macOS update, since Apple patches Wi-Fi bugs in point releases.
First published October 14, 2025. Last updated June 4, 2026.