Google Chrome is the most popular browser on desktops and remains the top choice among users who like to stay on top of new features. Like other browsers, Google Chrome has auto-updates. But for those who are cautious about what they install and how often, this can be a nuisance.
If you want to turn the option off, but are unsure how to do so, keep reading. Here is how you can disable auto-updates for Google Chrome in Windows 10.
More About Updates
Updating Chrome regularly is important for many reasons:
- A new version can enhance the browser's performance
- Latest updates usually bring bug fixes
- In addition, an update improves security
- The latest software update can introduce brand new features
As you can see, updates are important. If the program comes with automatic updates, you don't have to do anything manually, and that's a great thing. However, automatic updates can interrupt you while you work.
Some users prefer to update the browser manually. If you would like to do the same, move on to the steps below.
How to Disable Google Chrome Auto-Update in Windows 10
If you've decided to turn off this feature, follow the instructions below:
- Click on the Windows 10 search bar, type "msconfig", and press Enter. You can also use a combination of hotkeys Win + R to launch the window and type the mentioned command.
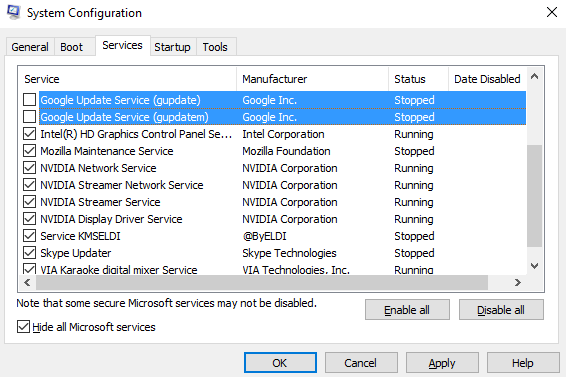
- Next, go to the Services tab and select the Hide all Microsoft Services option.
- Now uncheck Google Update Service (gupdate) and Google Update Service (gupdatem).

- Click Apply
- Now click OK
- A window with the requirements to reboot your PC will show up
- Click Restart
After completing everything, including the restart, you will successfully disable Google Chrome updates. You can always manually check for updates.


