Apple has integrated many exciting features on their latest operating system iOS 11 to make it more useful. Screen recording is definitely one of the best-added features in this OS that allow users to record what is there on their display. Anyways, screen recording is nothing new and we all are very much familiar with this phrase. But earlier we needed to either jailbreak the device to screen record or else the iOS device was required to pair with a MAC for screen recording using QuickTime. But thankfully all those difficulties are removed now as Apple has added the screen recording feature as a built in one on their iOS 11.
So, if you are wondering how to turn on screen recording in iOS 11, it is all explained in this article. Have a read to know that process.
See Also: How to enable screen mirroring in iOS 11
How To Turn On Screen Recording In iOS 11
The process is very simple that requires you to follow some two three simple steps and you can record the screen in just a second.
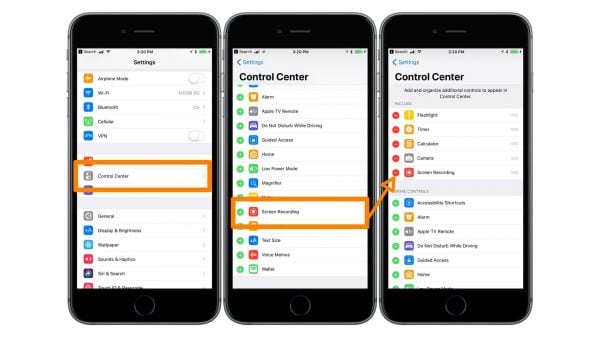
Step 1: Add the feature in Control Center
- First, go to the settings menu on your iPad or iPhone whatever you are using.
- Tap on Control center and go to the Customize Control Center option.
- Here you will notice ‘Screen recording’. Tap on the plus sign next to it and it will be added to the control Center. That’s it. You have successfully added the screen recording feature. Close the settings panel.

Step 2: Turn on screen recording in iOS 11
Recording without sound: In order to start recording the screen, just swipe up from the bottom of your display and it will bring the Control Center. Here tap on the button ‘Screen recording’ and it will turn red to indicate your screen recording has started. You will also notice a blue bar at the top which acts as a timer.

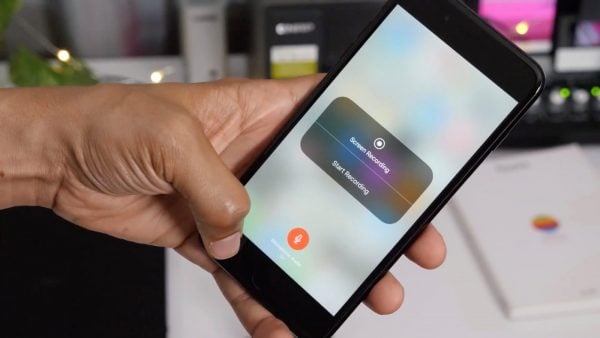
Audio screen recording: Swipe up from the bottom of your display and it will bring the Control Center. Here tap on the button ‘Screen recording’. At the bottom of the page, you will notice a microphone. Tap it to turn ON and then tap on ‘start recording’.
Step 3: Edit the recording
Once you are done with recording, stop the recording and it will be then saved to the camera roll on your device. Launch the Photos app to find the recording and there only you can go for editing the video. Once done with the editing, you can share it with your friends as well.
Some important Screen recording tips
Here are some important screen recording tips which will make the recording clean and clear.
- It is advised to turn off all the notification during the screen recording. The reason is when you turn on screen recording in iOS 11, it starts recording everything that is displayed on the screen. So, if any notification or message arrives during that time, it will be recorded. So, turn off the notifications, or put the iOS device into airplane mode.
- The next suggestion is to charge your iOS device 100% as the status bar too will be captured in the screen recording.
- Finally, go for trimming the screen recording a bit in the Photos app to make it much clearer. For example, when you stop the recording or else close the Control Centre that is captured on the recording. So, eliminate the first and last part of the video to make it look perfect.
So, this is how to turn on screen recording in iOS 11. Follow the above-mentioned process and you can capture anything on the screen with ease.
See Also: How to enable dark mode in iOS 11


