macOS Catalina is the operating system by Apple found in Mac computers. Launched in 2019, it came after the macOS Mojave. One of the popular features of macOS Catalina is voice control, which allows users to achieve tasks on their computers without using traditional input methods.
This feature is priceless for those who do not have the power to control their arms, as they no longer have to use other body parts. Anyone can easily use Voice Control since it takes a short time for the feature to get acclimatized to the user’s voice.
How to use voice control in MacOS Catalina

Turning on Voice Control
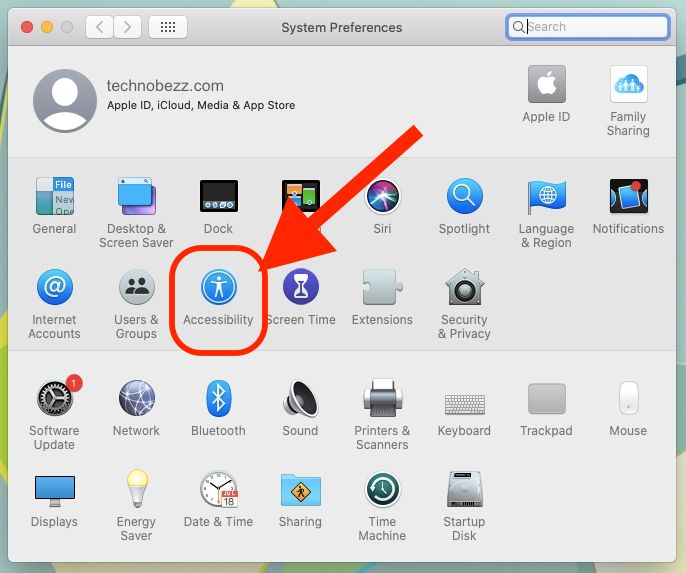
- Go to the Apple Menu > System Preferences, then Accessibility

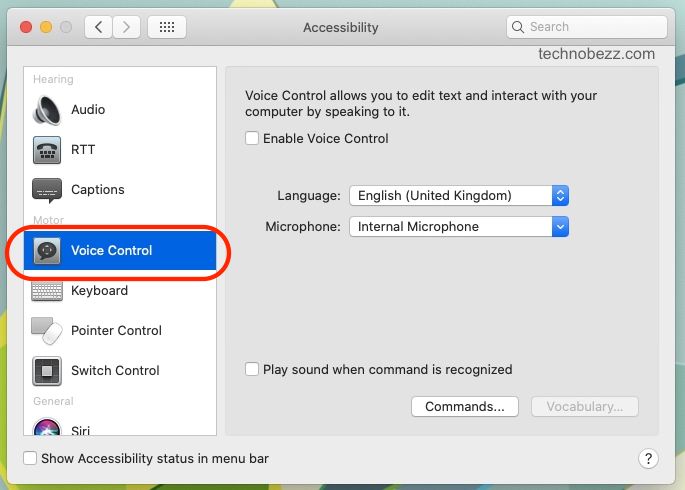
- Choose the Voice Control option.
- Once you’re there, click Enable voice control.

Alternatively, with a strong internet connection, you can ask Siri to ‘Turn on Voice Control.’
Voice Control will automatically function in the language that you’ve selected for your computer, but you can always switch it if you have to. Additionally, you can choose a microphone to help with the commands even though the internal microphone will already be selected.
The first time you turn on Voice Control on your Mac, your computer will complete a download from Apple. Once the feature is enabled, you will see a microphone icon on your screen.
To pause or stop Voice Control, say “Go to sleep” or click the Sleep icon. And then, if you want to continue with your Voice Control, say, “Wake up.” Or click on the icon.
Uses of Voice Control
The purpose of this feature is to help users who, for one reason or another, may not have a mouse or a keyboard or they may not be physically able.
Voice Control serves two main purposes: allowing people to dictate texts into documents and giving verbal instructions.
Voice Control can be used in all your Mac apps, and if you have no idea where to start with the commands, go to System Preferences and select “Commands.”
Here, you will find a long list of default commands that come with the feature, and they are arranged in categories, although you can also create commands of your own. To do this, select the plus (+) icon on the bottom left side of your screen.
Another way to create your command is by saying, “Make this speakable.” Remember to save the changes when finished.
Also, selecting the command will give you all the other options that can be used in its place. For example, instead of saying, “Click mouse,” you can also say, “Press mouse,” “Mouse click,” or “Single Click.”
When using Siri via Voice Control, you can start by issuing the command “Open Siri” and then ask a question like you usually would.
Navigating around your Mac
One option to go through your Mac using just your voice is by using numbers. You can start by allocating numbers to commands and various items on your desktop.
The Apple Menu automatically comes with commands that can control your Mac. Initiate this by saying, “Click Apple Menu.” Once the menu is open, you will notice that all the commands in there have been allocated numbers and all you have to do is say the number for the action you want to take. For example, saying “Three” will open a particular app, while saying “Five” may open a browser.
In the File menu and other app menus, you will find similarly numbered commands to assist you.
Converting speech into text
In addition to converting speech into text by dictating emails or on other word processing apps, you can also go over the text by issuing verbal instructions such as “Delete,” “Copy,” “Select,” etc. To see the pre-numbered commands in this app, say “Show Commands.” This will help you get your document finished sooner.
Browsing the internet
To launch your Safari browser, start by saying, “Open Safari.” To shut it down, say, “Quit Safari.”
Using Voice Control, you can issue commands on the web pages. Commonly used ones include “zoom in” to get a clearer visual of the page, and you can also zoom out. Another is “Scroll down,” which allows you to peruse the page at your leisure.
To go back to a recently visited page, say, “Click History Menu”. You’ll notice that each page has a number attached to it. Utter the number of pages you want to revisit.
All this feature takes is time and practice.


