Android 4.3 Jelly Bean update came with many improvements and the Galaxy S3 users who have updated their Galaxy S3 to Android 4.3 Jelly Bean and want to root their phones, here is a step by step process for them to root Samsung Galaxy S3 i9300. But the process is for Galaxy S3 that is running on Android 4.3 Jelly Bean only.
Things you should do before starting to root Samsung Galaxy S3 i9300

www.samsungsfour.com
- Install USB driver on your Samsung Galaxy S3 to transfer files between your computer and the phone.
- To root Samsung Galaxy S3 i9300, the process may remove the entire phone data, so create a backup.
- The installation process may damage the phone if it gets powered off during the installation. So charge your Galaxy S3 phone fully that is more than 80% before starting to root Samsung Galaxy S3 i9300.
- The factory of your phone should not be locked.
What People are reading now: How to update Samsung Galaxy S3 to Android 4.4 KitKat
Process to root Samsung Galaxy S3 i9300
This is a step by step process, follow each step carefully and you will be good to go.
- To root Samsung Galaxy S3 i9300, first you have to download CF-Auto-Root file on your computer. File name is CF-Auto-Root.
- Using any extracting tool such as WinZip, Winrar, or other extract the zip file and then you will get CF-Auto-Root-m0-m0xx-gti9300.tar.md5 file.
- Next you have to download Odin3_v3.07 and decompress the zip file.
- Turn off your Samsung Galaxy S3.
- Press the Volume down, Power and Home keys together and hold them until you see an Android robot icon with warning triangle on the screen. Then enter into the Download Mode by pressing the Volume Up button.
- Run the extracted Odin3 v3.07.exe file as Administrator.
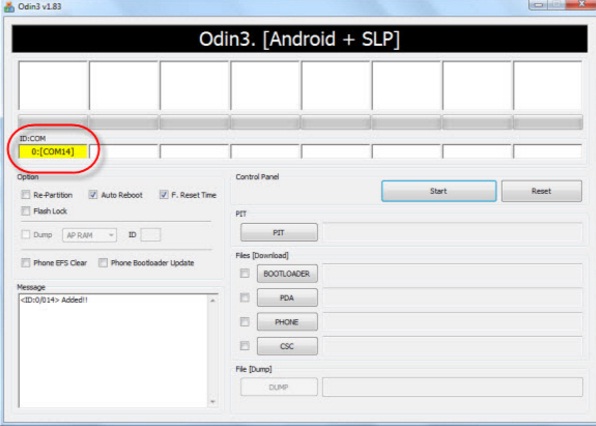
- Using USB cable, connect your phone with your PC when the phone is in Download Mode. Odin will take some time to detect the device. You will see an Added message under Odin message box when the connection is established successfully. Also the ID: COM box becomes blue color after successful connection.
- Now click on the PDA button in Odin and select CF-Auto-Root-m0-m0xx-gti9300.tar.md5 file.
- Make sure that F.Reset Time and Auto-Reboot checkboxes in Odin are selected.

androidtrickz.com
- Now click on the Start Button in Odin, it will take few minutes to complete the installation.
- After the installation is completed, your Galaxy S3 device will restart and at the top extreme left of Odin a PASS message will come with green background. After you see that the home screen appears on your phone, unplug the USB cable and disconnect the device from your PC.
Samsung Galaxy S3 running on Android 4.3 Jelly Bean now should be rooted successfully. You can verify the root status of your phone by downloading Root Checker app that is available in Google Play store. Then you can install the apps on your phone that require root permission. If you see that the device does not install root then repeat the whole process again and make sure that you are following every step.
What to read next – Effective Tips on How to Speed Up Slow Running Android Phone.


