We often need to connect our computer to the internet for work and other purposes and this is the main source of malware. If you get lots of pops up, your computer runs slower than usual, and if you notice some weird problem is happening while working on your PC, that means the computer might got infected by a virus or malware. It happens even if any antivirus software is been installed on PC. Before you run for tech support here are some steps to remove malware from your windows PC.
People who are facing other computer related problems such as error unmountable boot volume or others, visit here. Tips and tricks like how to hide files in your PC are also given here.
See also- How to fix computer beeps on start up
Ways to delete malware from your Windows PC
Step 1: Boot PC in safe mode
Do not connect your PC to the internet until the malware is removed. It will prevent the malware or virus from spreading. Now to make sure that the PC is infected by malware you need to boot your windows PC to safe mode. Only the minimum required services and programs are loaded in PC in this mode. So if any malware is loaded automatically when your windows PC starts, this mode will prevent that. Here are the steps to boot your PC into Safe mode:
- Shut down your computer
- Now turn the PC on
- Keep pressing the F8 key in the keyboard as soon as anything appears on the screen
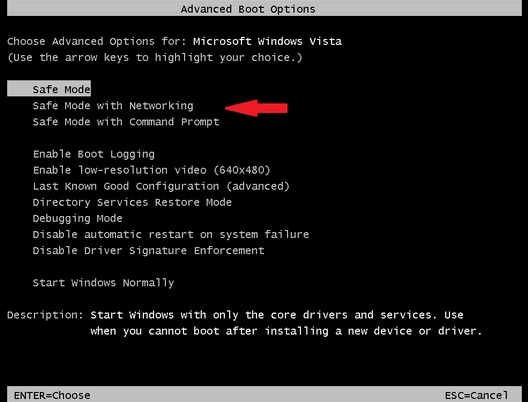
- It will bring Advanced Boot Option menu
- You have to select Safe Mode with Networking there
- Hit Enter.
If the windows PC runs faster in Safe mode, then it’s a sign that the computer is infected by malware or so many programs are there in your PC that slows the windows.

Step 2: Remove temporary files
In Safe mode before you run a virus scan to remove malware from your windows PC, erase the temporary files. It may help in speeding up the virus scanning, remove some malware and also free up disk space. For that, go to Start > All Programs > Accessory > System Tools > Disk Clean up.
Step 3: Download and install malware scanners
Most of the infections can be deleted by running a scanner. If an antivirus program is already installed on your PC, then look for a different scanner for malware checking as the current antivirus program could not detected the malware. There are millions of malware variants and types, so no antivirus program can detect 100%.
Two types of antivirus programs are there, real time antivirus software which checks for malware constantly and the other one is on-demand which you need to open manually to search the malware infections. You should install a real-time antivirus on your PC and keep some on-demand scanners handy to scan multiple programs.
If your computer is infected, then to delete malware from your PC first run an on-demand scanner and then scan with your real-time program.
Some of the on-demand scanners are BitDefender Free Edition, SuperAntiSpyware, and MalwareBytes.
Step 4: Run a scan with scanner
You can download any of the above on-demand antivirus scanners, here we will discuss about MalwareBytes, so first download it. Connect your PC to the internet, download this software, install it and update and then again disconnect from the internet.
After the download is completed, run the setup file and install it. Once installed, it will check for update and the software will be launched itself. If a message shown to you about the database being updated, select Yes (It will download the updates), then press Ok when the installation is completed successfully.
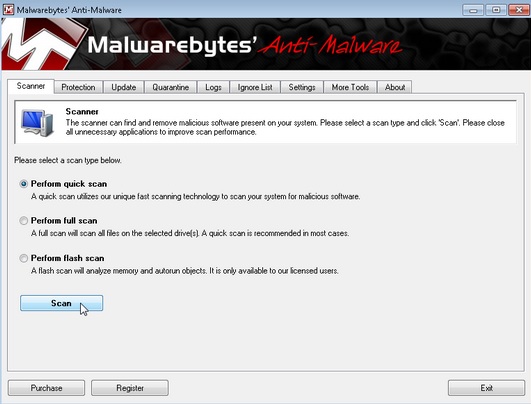
After the program is open, click on the Scan button (do not change the default selection). The program offers full scan, but MalwareBytes recommends for quick scan first. It may take 5-20 minutes whereas full scan may take 30-60 minutes depending on the computer. At the time of scanning the program will show you how many files are already scanned, how many of them are infected by malware and how many malware it has detected.

If you see that the MalwareBytes goes away automatically after starting the scan and it won’t reopen, then there is any deep infection which is not letting the scanner to remove them. In such situation it’s better to reinstall Windows after backing up the files.
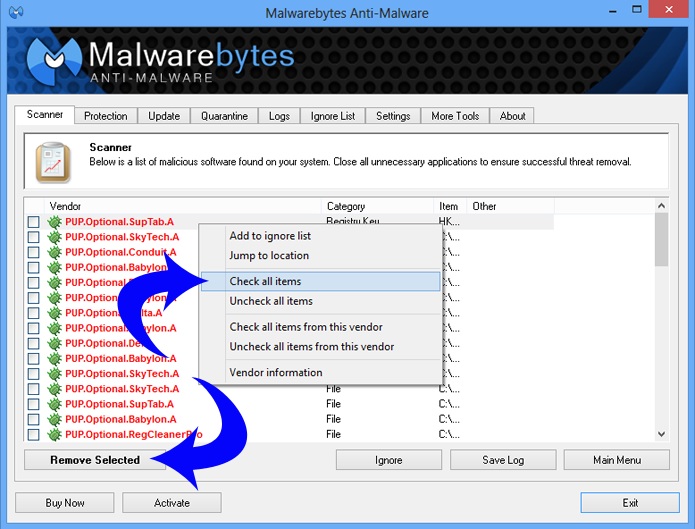
And if the quick scan of MalwareBytes cannot find any infections, a text file will be shown to you containing the scan result. Then run full scan and you can try other scanners as well. But if MalwareBytes finds infections, a dialog box will be popped up with warning you of the discovery. Click on the Scan Result button to see the suspected files. The files that are dangerous remain automatically selected, select the other detected items as well if you want to remove them. Click Remove Selected button.

After the infections are deleted, a text file will appear listing the removal and scan result. Confirm that the program has removed all malware successfully. Now restart your PC when prompted to complete the removal process.
If the quick scan does not work to remove malware from your windows PC, then run a full scan with MalwareBytes.


