USB drives are able to store a great amount of data and sometimes the stored data are really sensitive and can’t be disclosed to anyone else. As the USB drivers are small, you can easily lose them. So what might happen if that USB drive contains all the vital information such as credit card details, bank account number etc. and it falls in the bad hands? Password protect USB drive or encrypted USB Drive is the best solution for that. If you are not familiar with that, here are the various methods described that you can follow to Password protect flash drive.
Read here about the 10 steps of how to reformat computer using USB Flash Drive
Also, if you want to know what USB OTG is and how to use it, you will find the information here.
Ways to password protect and encrypt USB drives:
Method 1:
The first method describes how to password protect a USB drive. This method is best used in cases where you just want to protect some information in the drive, but not the whole drive. Some programs come with a built in feature to protect the files using passwords, and there are some great third party applications.
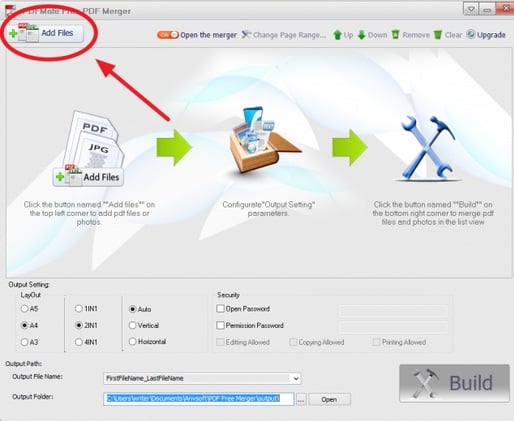
PDF Mate is such useful tools to Password protect USB drive PDF files.
- What you need to do is just install the software on the computer and launch it.
- Next, click on the ‘Add files’ to select the file that is required to be protected using password and click ‘open’.

Image source – www.digitaltrends.com
- In the next window, select the file and it will be highlighted. Tick the checkbox located next to the password and add the password in the next field that will be used to open the file.
- Next, tick the checkbook ‘permission password’ to restrict other function such as copying, editing etc.
- In the layout option, select ‘1IN1’ to make sure you are not looking for any other changes and then click on the ‘Build’ button. That’s it. It will create a new folder and will be displayed in the USB Drive.
Method 2:
The second method describes the process of encrypting a portion of the Drive. In case there is much sensitive information to be stored in the Drive, the best thing is to encrypt a portion of the drive and keep the information on that part. This is a good alternative of password protect flash Drive.
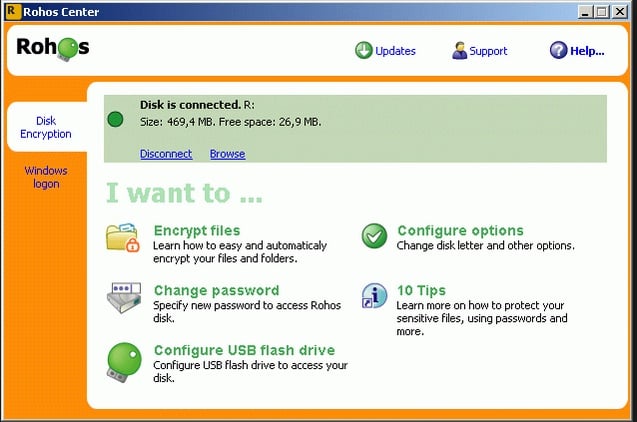
- Rohos Mini drive is the software that is to be installed for this purpose. There are two versions, free and paid. The free version allows you to encrypt 8 GB, but for more, the paid version is required.
- Once installed, launch the program and click on ‘Encrypt USB Drive’ in the main menu.

Image source – rohos-disk-encryption.soft112.com
- A new window will be displayed where you are required to click on ‘change’ to make some properties of the partition that will be created.
- Just specify the disk letter and sizes in MB. No other changes are required. Now, click ‘ok’.
- Next, two blank fields will be displayed where the password should be entered. Make sure the password is strong enough with a combination of numbers and letters. Click on ‘create disk’ and encryption is completed.
- To use the encrypted drive in any other computer, just plug it in and the Roho icon will be displayed in the task bar. Click on the icon and right click to select ‘connect disk’. Next, you will be asked to enter the password in order to load the drive in the computer. When you are done, right click to disconnect the drive.
So, the encrypted drive is much more protected than a password protected flash drive.
Method 3:
With this method, you will learn the process to encrypt a whole drive rather than a small portion. This process is much easier and Diskcryptor will do the job. Those who are willing to know how to password protect a USB drive can go through the steps below:
- First download and install the software on your computer.
- Launch it and click on ‘Encrypt’ in the main interface to start the encrypting process.
- A new window will appear where you should not make any changes, just click ‘Next’.
- On the next page, enter the password and press ‘OK’ to confirm the process. Encryption is done.
- In order to use it, launch the tool again and select the drive and click ‘mount’. You will be asked to provide the password. Enter the password and you can use the disk then.
Read also- How to fix USB undetectable problem on Samsung Galaxy Tab 2


