A lot of Samsung Galaxy S5 users have been facing issue with MMS messages. Some users reported that neither they are able to send MMS messages, nor they receive MMS messages on their Galaxy S5. If you too are facing the same issue i.e your Samsung Galaxy S5 cannot send and receive MMS messages, do not consider it as a firmware problem or manufacturing issue as it is mostly related to the network problem. However, it is not the network that has the problem, but the data that is needed to connect to that network APN settings.
In most cases the MMS messaging issue is resolved by getting the correct APN from the carrier or service provider. Here are some ways that to help you solve your Samsung Galaxy S5 cannot send and receive MMS messages issue.
See also: How To Fix Mobile Data Connectivity Issue On Galaxy S5

Steps to Fix Galaxy S5 Cannot Send And Receive MMS Messages Issue
Check your mobile data
If you think that your Galaxy S5 can easily transmit MMS messages if it can send and receive text messages or if your phone is connected to a Wi-Fi network, then your concept is wrong. In order to send and receive MMS messages, you have to turn on the mobile data.
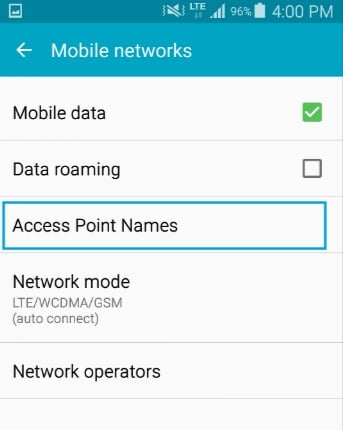
Check APN settings
If you are using the services of the service provider or the carrier where you purchased the phone, then APN will be set already. But you have to make sure that it is correct by going to Settings > More Network> Mobile Networks > Access Point Names > Menu Key > Reset to default.
www.thecellguide.com
Contact the service provider
If you have bought the phone from a company and using the service of another service provider, then contact the service provider and ask for the correct APN. For example, if you are using the service of Straight Talk (ST) but purchased your Galaxy S5 from Verizon, then contact ST and enquire for the APN.
Factory reset
If you think that you have messed up the settings of your phone and do not know how to bring it back, then the factory reset is the solution because it will bring your Galaxy S5 to its default settings. But before you proceed with the for factory reset, backup the important files. Read out the process here in detail.
There are several ways to create a backup of your phone. Follow the below steps to create a backup first.
- One of the best options is to make use of Samsung’s very own kies software that we normally use to update the software of our Galaxy devices.
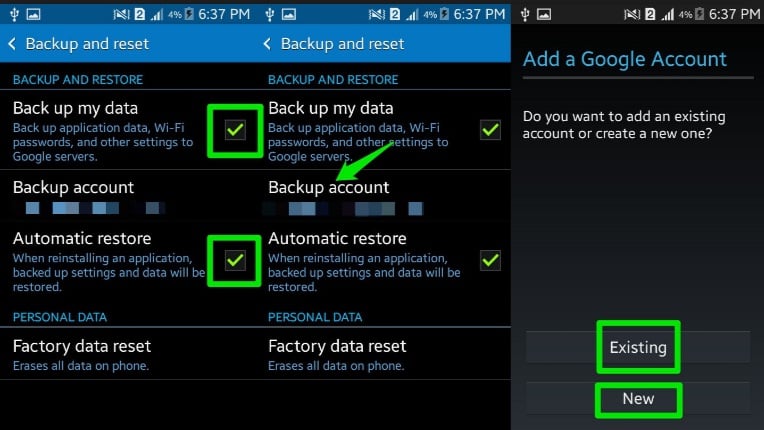
- The second way to create a backup of the device is with Google account. Head towards Settings> General> Backup & Reset and it will provide two options named Backup my data and Automatic restores. Ensure those options are made on by ticking the check box next to them and it will backup details like Wi-Fi password, app data, Google settings, and bookmarks automatically to Google server so that they can be retrieved again in case anything wrong happen with the device.
www.ubergizmo.com
- Another useful and easiest way to create a backup is using Samsung account. For that go to Application > Settings> User and backup> Account and check if you are signed in with your Samsung account. If the option is set to On, it will sync the contacts, calendar and internet settings to the Samsung account.
Once you are done with the backup, go ahead with the factory reset process. Here is how to perform it on your Galaxy S5.
- Turn off your device first.
- Next, hold down the Home, Power and Volume Up button altogether for few seconds till Android logo shows up.
- Release the buttons then. Use Volume down button for highlighting any options and Power key to confirm it. What you need to do is highlight the Factory reset option and confirm it using the power button.
- Next, select ‘delete all user data’ and confirm it.
- Wait for few seconds to see the ‘Reboot system now’ option and select it. The phone will restart then and you need to set it up from scratch again.
Also Read

Recent
Ottocast Car TV Mate Max Review – A Versatile In-Car Entertainment Adapter
iPhone Battery Dying In Minutes? 23 Real Fixes That Work
Ottocast Play2Video Pro Ups the Game in Affordable Car Entertainment
Ottocast OttoAibox P3 Powers a Smarter Driving Experience
How to Disable WebRTC in Your Browser Settings
Guides

Lenovo Debuts Solar-Charging Laptop That Turns 20 Minutes of Sunlight Into Hour of Video

Why Do Smartphones Get Slower Over Time?

Decoding Tech Jargon: The A to Z Cheat Sheet (Free Downloadable PDF)

How to Clear an App's Cache on Your Samsung Device

Why Are My iPhone Messages Green Instead of Blue?

Everything Google Knows About You (And How to Stop It)
