A number of troubleshooting steps will require a backup because if anything goes wrong, you would like to have a backup of all your data and files stored for you. You can then restore your phone with the help of this backup. Backups can be created on iCloud which will be in the cloud and you can access it through different devices, or you can create a local backup on your Mac or PC through iTunes. iCloud and iTunes have their own benefits and you can choose the backup option that is suitable for you. You can also create backups in iTunes and iCLoud simultaneously if you prefer having a second alternative for your backed up files.
Difference between iCloud and iTunes backups:
Storage – The first 5GB of data stored on iCloud is always free. If you need more storage space then you can check the storage packages. You can store data up to 2TB of data on iCloud. Since iTunes stores data locally on your computer, you can store as much data as your computer allows.
Encryption – iCloud always encrypts all the data that is saved on its servers. On the other hand, iTunes offers encryption but it is switched off by default.
Accessibility – iCloud users can create backups and access those files from any of your devices. iTunes users will be able to access the files only from the computer on which they have created the backup.
iCloud Backup
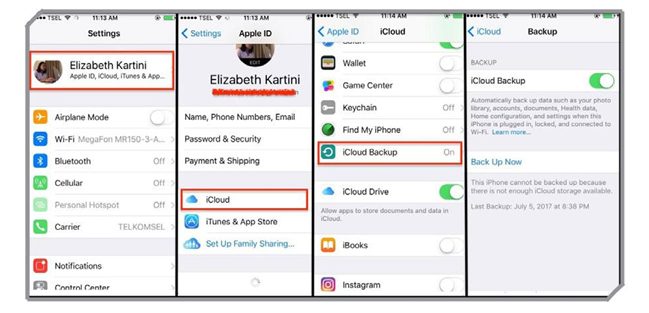
To back up your device on iCloud, you must first ensure that you are connected to a Wi-Fi network.
- Head to Settings
- Tap on your name (iOS 10.3 and later)
- Go to iCloud
- Tap Backup or iCloud Backup depending on the iOS version you are using
- Toggle on the iCloud Backup option
- Tap on Backup Now. Make sure that you are connected to your Wi-Fi network for the entire time so that the backup can complete without any problems.
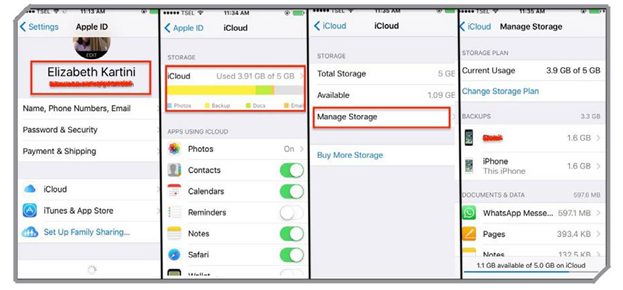
- Once the backup is created, you can check it by following these steps:

- Go to Settings
- Tap on your name (iOS 10.3 or later)
- Tap on iCloud
- Go to iCloud Storage / Storage
- Tap Manage Storage
- Select your device

You will find the backup details along with the date and the time mentioned on it to confirm that the backup has been completed successfully.
iTunes Backup
If you would like to use iTunes for your backups then follow these steps:
- On your computer, open iTunes and make sure it is updated.
- Connect your iPhone to the computer using the 30 pin connector
- You may have to enter your passcode or agree to a message that says do you trust this computer before you proceed.
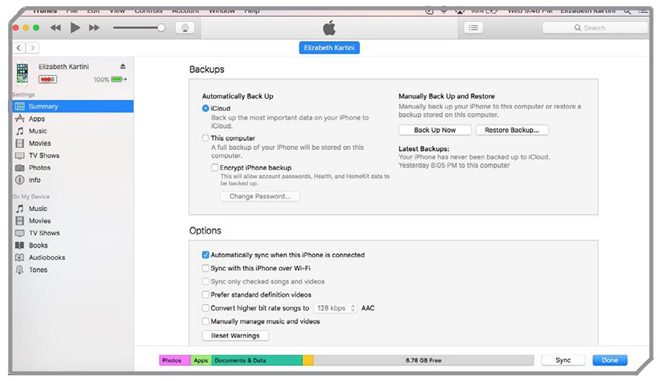
- Click on your device name when it comes up on the screen
- Click on the Summary tab and you will see the option to back up your device
- If you are backing up your Health and Activity data along with other files then you will be required to encrypt your data.
- To encrypt your data, you must click on the checkbox that says Encrypt iPhone Backup and choose a password
- Here you can also choose to automatically back up all your data to iCloud or to the computer.
- Click on this computer to create a local backup of your iPhone data. Click on Back Up Now to begin the backup process.

Once the backup is created you can check that it was completed successfully by going to iTunes Preferences and then clicking on Devices. Windows users will find it under Edit and then Devices. The name of your device along with the date and time when the backup was created will be mentioned here. If your data is encrypted then a small lock next to your device name will confirm that you must enter a password to access the data on your backup.
By creating a backup you can easily be assured that your phone can always be restored to its old settings or the old software if anything goes wrong. Backups are helpful for a number of reasons, and when you are troubleshooting your iPhone, a backup can save you from a lot of problems if you end up accidentally deleting essential data.


