Android comes with more improved and many newer features with its every version. Android 4.4 (KitKat) is one of the latest versions of Android and some of the Android KitKat tips and tricks are discussed here.
See also- How to set up your android watch

Android KitKat Tips and Tricks
How to remove large application
If your phone is full of memory, and you need enough space to download something, then it is good to remove the large applications that are not required at all.
For this, first go to settings and tap on ‘More’. Select ‘Application manager’ next and then swipe from right to left to select running. This will show the list of applications, and the space occupied by them. So you can easily select and uninstall the applications that are not required and taking most memory.
How to highlight word
When you enter a word in the apps such as messaging app or Facebook app, tapping the word starts selecting the text. Now drag the left and right sliders to select the words then to highlight.
However double tap on a word select the word, and this process is very handy and quick for copying anything.
How to take a screenshot
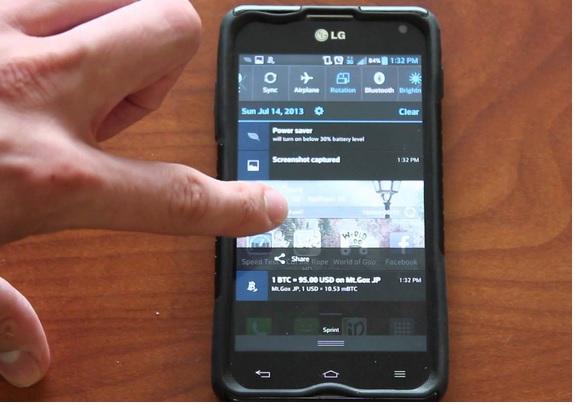
This is one of the android KitKat tips and tricks that help in taking screenshot. In order to take a screenshot press and hold the Volume down button and power button together. This process will save the current screen in the phone’s memory. You can locate this by going to a folder in the My Files App. Follow the path to get the screenshot-folder > Device storage > pictures > screenshots.

How to take a screenshot
How to take photos while recording video
Android latest version gives the facility of multitasking, and you can take a photo at the same time while recording is also going on. Start recording and at the same time a picture can be taken just by pressing the screen. This picture will be saved in the gallery just like other pictures while continuing to record the video.
How to display owner info in the locked screen
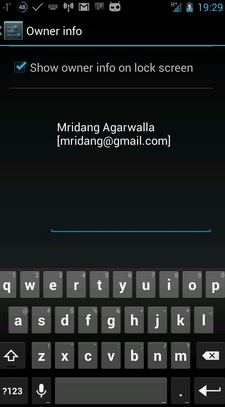
Android KitKat has an excellent feature that displays your name, contact number and email address in the locked screen. This is a very good feature that helps to find the phone in case you have misplaced it. Whoever has got the phone will be able to return you by going through the info details. However, you need to activate this feature first.
> To activate the feature head to settings.
> Click on the ‘My device’
> Choose ‘Lock screen’ from the option and then ‘Lock screen widgets’
> Scroll down to bottom to get the option owner information. Click on that.
> Type any information you want to show in the locked screen such as your name, or email address, or the contact number.

How to display owner info in the locked screen
How to allow swear words in voice recognition
This is a feature of the android operating system that recognizes swear words by default, but it put in X’s instead of words. You can easily change this by going to the settings.
> Head to settings for this.
> Select ‘My device’.
> Next go to Language and input.
> Search for the Voice search option and unmark the checkbox next to ‘Block offensive words’.
The process is completed.
How to set up a new email account
If you want to set up a new account, then go to the apps and select the email icon. Clicking on that will give you a setup wizard. Enter the username and password in the details. Once you have given all the details, give a name of the account and save it. If you want to change the settings such as the username or the password, then this is possible by going to the settings in the email account.
How to import contacts from an old phone
If you want to import the contacts from an android phone, then this is very easy and simple as you need to do hardly anything. Make sure that the contacts of your phone are stored in the Google server under the Gmail or Google login rather than in the phone memory. When you log in to the Gmail account or in Google account in your new phone, all the contacts will automatically be imported to the new phone.
In case your old phone is not the android one then first the contacts should be exported to a CSV file (comma separated value) and save this file to your PC. You need to find the correct software for exporting the contacts into the PC first.
The next process is to sign up for a new Gmail account if you do not have. Next launch the Gmail account and click on the contacts > More > import. Now import the CSV file to the Gmail account.
Open the contacts app then in your new phone and press menu > sync contacts. This will bring the contacts from your Gmail to the phone.
So you can now start exploring your android KitKat phone to enjoy the above Android Tips and Tricks.


