With Windows 10, the taskbar received some pretty cool features, but it also has a fair share of bugs and glitches. The Windows 10 upgrade witnessed some frustrating errors, such as Windows 10 taskbar not working, icons vanishing, not being able to click anywhere on the taskbar, etc.
If you are facing such issues, keep reading. Possible fixes are listed below.
See also: What version of Windows do I have?
How to fix the Windows 10 taskbar
There are several simple things that you can try if the taskbar misbehaves. We have listed them all. If nothing works, you'll have to be patient and wait for the update.
Method 1: Fix Corrupted Files
Numerous software applications on the web scan and repair corrupt or missing files from the system.
Use the repair software of your choice before attempting to make changes with your own hands. You can go for options such as Restoro, CCleaner, or Stellar software.
After running a scan and fix, note the changes in the taskbar. If it’s still not fixed properly, move on to the following method.
Method 2: Running a Command in PowerShell
The taskbar is a Windows component, and whenever a Windows component causes a problem, it can be fixed with a PowerShell command.
The PowerShell command allows you to register your taskbar if it isn’t done already. This involves deleting the entire folder related to the taskbar. For most users, this method has worked, and you probably will not have to try another way after this.
Before running the PowerShell command, it must be noted that the Windows Firewall is active.
- After turning the firewall on, simultaneously press CTRL + ALT + DELETE to open Security Options.
- Click on "Task Manager," then "File," and then "Run New Task."
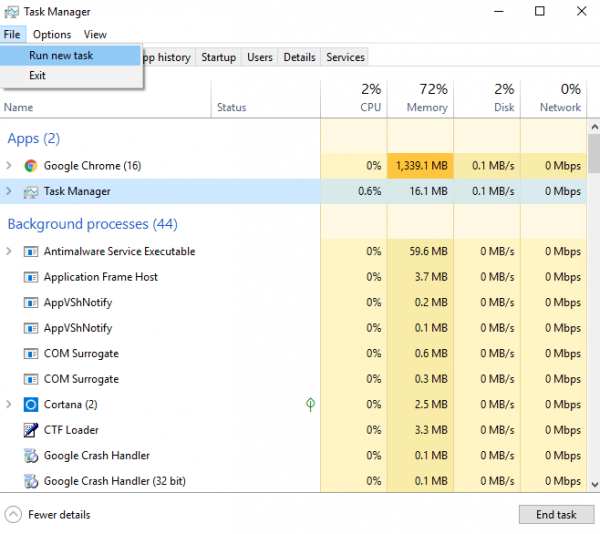
- In the new dialogue box, type "PowerShell" and then check the box beside the option: "Create this task with administrative privileges."
- Click OK.
This will give you a command prompt with a dark blue background. Type in or copy-paste the following command and press Enter:
Get-AppXPackage -AllUsers | Foreach {Add-AppxPackage -DisableDevelopmentMode -Register “$($_.InstallLocation)\AppXManifest.xml”}
- Once the command is successful, there is no need to restart your PC.
- Close PowerShell and navigate to C:/Users/youraccount/AppData/Local/ (where youraccount is the name of your Microsoft account)
- Delete the folder named; ‘TileDataLayer.’
This should instantly solve your issue.
Method 3: Shut down the Tile Data model server
If you cannot delete the folder above or simply the PowerShell Command didn’t work, stop the Tile Data model server service and attempt to delete the folder again.
The folder will be successfully deleted. Furthermore, you can rerun the PowerShell command to ensure the taskbar is fixed. Similarly, the taskbar is one of the leading Windows 10 components so fixing it heavily depends on the effective use of PowerShell.
To stop the "Tile Data Model Server" service:
- Type 'services' in the search bar or desktop
- Select "Services" from the pop-up menu
- This will show you all the active and inactive services on your system
- Search for "Tile Data Model Server" and right-click to "Stop" the service.
Method 4: Stop the Local Security Authority Process
Here is another thing for you to do:
- Press CTRL + ALT + DELETEon the keyboard to open "Task Manager."
- Locate the "Local Security Authority Process’ under the ‘Process’ tab
- Click on the process and then click on the "End Task" on the bottom right of the task manager
- In the next confirmation window, check "Abandon unsaved data and shut down."
- Click Shut Down.
This should remove the very last remaining error in the taskbar. If any of these methods did not work for you, then your only choice is to wait for the Windows 10 update.
